Drywall Repair is a necessary part of home renovation and remodeling projects. However, it is a messy and time-consuming process. It creates fine dust that can be inhaled and damage surfaces and furnishings. It’s important to wear a dust mask and eye protection.
You only need drywall mud or spackle, a putty knife, and a sanding block for small holes. For voids like screw holes, apply self-adhering mesh tape and fill. Read on Drywall Repair Las Vegas to learn more.
Drywall can become damaged by water damage resulting from a leaky roof, flood, or condensation caused by central air conditioning. Whatever the source, drywall (also known as gypsum board or wallboard) will quickly deteriorate and must be repaired to prevent further damage.
The first step in repairing water-damaged drywall is to remove the spoiled section. This should be done carefully and without causing any additional damage to the surrounding area of the wall. Once the affected area has been removed, it should be thoroughly cleaned and dried.
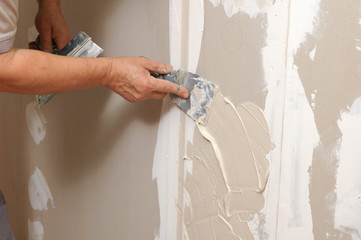
Next, a new section of drywall needs to be installed. This can be done using a joint compound, but it is important to use a skim coat to make sure the patch is even with the surrounding wall before adding another layer of joint compound. If there is still a visible difference in texture between the new and old sections of the wall, the new section should be sanded with 220-grit sandpaper before applying another skim coat.
This process should be repeated until the patch is smooth and matches the rest of the wall. Then it is ready to be painted.
While some drywall repair can be done by a homeowner, it is usually better to hire professionals. This is because, besides having the right equipment for the job, they also know how to use it properly which produces better results. They also save you time because a project that they could do in a couple of hours would take you a few days to do if you were trying to fix it by yourself.
Water damage to drywall can cause mold and mildew to form, which can pose health issues for your family. If left untreated, the drywall can begin to swell and crack, which will not only ruin its appearance but may compromise the structural integrity of your home.
The best thing you can do to protect your home from water damage is to catch any problem as soon as possible. Whether it is caused by a roof leak, a burst pipe, or condensation from your HVAC system, catching the issue early will minimize water damage and repair costs.
Mold Damage
Drywall damage often carries mold, which is a serious health concern. If black visible mold appears on the drywall, it may indicate that there is also more in the walls behind. In this case, it is recommended that you have the affected area professionally inspected and if necessary, cleaned or removed.
If a piece of drywall is visibly damaged and you are confident that it is safe to keep in place, use a drywall patch kit to repair the hole. It is important to properly prepare the wall for drywall patching, including moving furniture and covering flooring. It is also a good idea to put on a face mask and protective eyewear. The drywall dust created during this process is a respiratory irritant, as it contains super-fine gypsum and silica particulates.
Depending on the extent of the damage, you may need to remove a section or the entire wall to ensure that the problem is contained. To do so, knock a hole in the damaged drywall and use a hammer to loosen it. Carefully pry the section away, taking care not to break the studs behind it.
Before reinstalling drywall, you will need to clean and treat it with a fungicide to kill any spores that are present. This is the only way to be sure that the drywall will not become a breeding ground for harmful microorganisms.
Then, the drywall should be taped and sanded smooth. Then, apply a layer of drywall compound and let it dry. Finally, sand the wall again and paint.
If you decide to remove and replace a damaged section of drywall, take the time to inspect the rest of the wall for moisture and mold damage. If you suspect that there is more damage inside the wall, shut off power to the affected area at the electric service panel. Cut a square from the back of the wall with a drywall jab saw and then remove the piece to check for microbial growth on its surface and in the insulation.
If there is more than 10 square feet of affected drywall, mold remediation should be done before new drywall can be installed. This is typically done by a professional, who will disinfect and treat the affected areas with a fungicidal encapsulant.
Sagging or Cracking
This is a very common issue and can be caused by a number of things. First of all, it is important to determine whether or not the sagging is simply a natural part of settling in the home or if it is caused by structural damage that needs to be addressed.
If the sagging is caused by structural issues, then only a qualified professional will be able to provide a permanent solution. Depending on the severity of the problem it may be necessary to remove and replace sections of the ceiling.
One of the most common causes for sagging in a home is simply due to uneven load bearing. This can be caused by a lack of insulation, inadequate attic ventilation or by the installation of new appliances, furniture or equipment in a room. To fix this issue you will need to increase the amount of insulation in your attic and improve ventilation. Additionally, you can install a brace across the top of the ceiling joists to help stiffen them and decrease any movement.
Another reason for sagging is that the joists or trusses supporting the plaster are spaced too far apart. This can cause the plaster to sag and then crack when the normal expansion and contraction of the building materials takes place. To fix this issue, you will need to space the joists or trusses further apart and install a brace across them.
Cracks in drywall are also common problems and can occur for a variety of reasons. Some cracks are very straight and appear along the edge of a drywall joint. This is typically a sign that insufficient mud was used when the drywall was installed.
In other cases, a drywall crack will form around a nail or screw that was driven into the wall or ceiling too quickly. To fix this, you will need to remove the screw or nail and re-drive it. When you do so, be sure to use a drill with a metal bit that will penetrate the wood lath or stud.
Drywall cracks that develop due to lumber shrinkage are typically easy to repair. To fix them, you will need to sand the damaged area and apply several skim coats of joint compound. Each coat should be slightly larger than the previous one and sanded smooth with 220-grit sandpaper. You can then roll on a coat of primer and two topcoats of paint to make the repairs undetectable.
Hole Repair
When a hole in your wall appears from whatever cause — a wrecking ball during a movie shoot, your child flinging a toy or a careless mistake when moving furniture — a patch kit is often all you need. These kits have a self-stick patch with an adhesive backing that easily adheres to the smooth surface of drywall. Just be sure to sand the edges of the hole, so the patch sits flat against the wall and doesn’t stick up.
If you don’t have a patch kit, you can fill small holes with spackle or lightweight joint compound, also known as drywall mud. Apply it using a putty knife made for drywall repair, rather than wood putty, then smooth and feather the edge of the patch so it blends into the existing wall. You’ll probably want to sand and prime the patch before painting.
Larger dents and holes may require more work. You’ll need a patch, sandpaper, a utility knife, a putty knife and possibly a drywall saw or utility cutter. If you need to cut into a wall to get to the damaged area, use a stud finder to locate and mark the studs around the hole. Then, use your drywall saw to cut a replacement piece of drywall. Be sure to cut it so it’s the same size as the stud-to-stud hole you’re replacing and place furring strips on the back of the replacement, if needed.
To finish the repair, you’ll need a new piece of drywall, some sort of drywall support (a piece of plywood works well), drywall screws and joint tape. You’ll also need a stud finder and a utility knife to cut the drywall support, which is placed over the hole to keep it from collapsing into the hole again. Once you’ve applied the support, screw it to the studs, add joint tape and use a putty knife to apply a thin coat of drywall compound over the patch and smooth and feather the edges of the repair.
Be sure to sand the dry second coat of compound and then paint the repaired area to match the color of your walls. Minor blemishes like nail holes can be covered up with a dab of touch-up paint that blends in with the color of the wall. But if the hole is larger, you’ll need to repaint the entire wall.